Getting Started with dRonin
This page will help you get started with dRonin. You'll be up and running in a jiffy!
The following page describes how to install the dRonin firmware and how to configure your flight controller for your first flight.
Once your have a dRonin compatible flight controller, it is time to get it configured and ready for flight. Please follow the steps in each section carefully and with attention to detail.
If you run into problems, consider joining the dRonin IRC Chat from the link at the top of this page.
Basic Vocabulary
- Flight controller : the electronic device mounted in the aircraft. The device can be a CC3D, Sparky2, or other supported device. Sometimes the type of flight controller is called "target".
- Ground Control Station (GCS): the software that runs on your computer that is used to configure the flight controller.
Installing the software on your computer and flight controller
- Download the dRonin Ground Control Station from here.
- For Windows, you have the choice between a portable .zip file and an .exe installer that will install the software on your system. If you use the zip, there is a convenient batch file named createShortcut.bat that will create a shortcut to the dRonin GCS in the top level directory. If you don't know which you'd prefer, use the .exe.
- On Linux, there is a .deb package for Debian derived distributions like Ubuntu; or a .tar.xz file for portable installation.
- On Mac, a .dmg is provided; open it and drag the GCS to your Applications folder. The first time you run GCS, you may have to right-click on 'dRonin GCS' and select "Open" to let the operating system know this is software you deliberately installed.
- Open GCS. You will see a welcome screen:
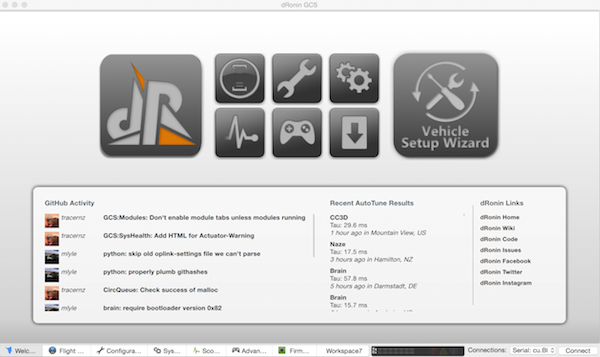
Welcome Screen
Installing on Naze32
Additional steps are required to install the firmware on Naze32 or on flight controllers that do not contain an OpenPilot/Tau Labs/dRonin bootloader. See Using Naze32 for more details
- Plug in the flight controller using USB. A window will pop up to monitor the upgrade process.
If the controller was not previously running dRonin, you will see a dialog like this:
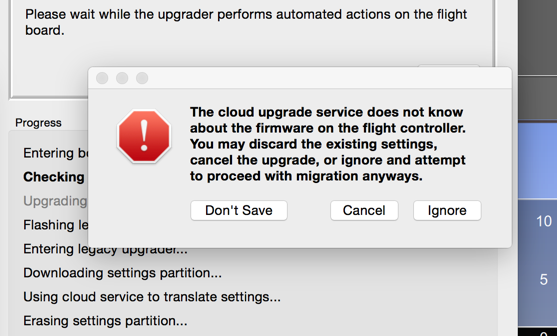
Warning dialog
Select "Don't save" to start a clean configuration from scratch. If instead you are upgrading an existing Tau Labs or dRonin flight controller, please see Upgrading an Existing Flight Controller .
Follow the prompts, and dRonin will automatically be installed on the flight controller.
Configuring the flight controller using the Vehicle Setup Wizard
Caution
Subsequent steps will ask you to attach battery power to the controller. Remove all propellers from an aircraft during configuration. During configuration, propellers can spin unexpectedly and cause serious injury.
dRonin contains a Vehicle Setup Wizard that simplifies configuring multirotor aircraft. To use it, select "Vehicle Setup Wizard" from the "Tools" menu, and follow the prompts. The wizard will help you:
- Configure the radio control input type
- Calibrate the sensors on the board for level
- Select the airframe type (quadcopter, hexcopter, etc.) and ESC configurations
- Set the minimum pulse duration for the outputs to ensure motors spin reliably
Configuring the radio control using the Radio Setup Wizard
dRonin also contains an Radio Setup Wizard that can be used to calibrate the radio control for the aircraft. To use the Radio Setup Wizard, a radio receiver (rx) must be attached to the flight controller and bound to the transmitter.
Most flight controllers do not provide power to the radio receiver when powered only by USB. Therefore, attach a battery to the aircraft.
Transmitter and failsafe configuration
In order to use an arming switch or other optional channels, you may need to configure these channels on your transmitter. Refer to your transmitter documentation for details.
It is also essential that you configure your radio receiver to not send any output when the radio connection is interrupted. On FrSky receivers this is accomplished by pressing the bind button when the transmitter is turned off.
To start the wizard, select "Radio Setup Wizard" from the "Tools" menu.
Follow the prompts. You will be instructed to move each channel in sequence, to center all channels, and to move all channels (including switches) to their maximum extents. After completing input wizard be sure to click 'Save' on the input page.
Remapping output (motor) channels and setting board orientation
The Vehicle Setup Wizard assumes motors/ESCs are attached to the flight controller in a specific order. Note that the order differs from other flight controller firmwares like CleanFlight (see the Naze32 page for details). In the configuration interface, on the vehicle setup pane, it is possible to remap the motors without moving any wires. Be sure to save after making any changes.
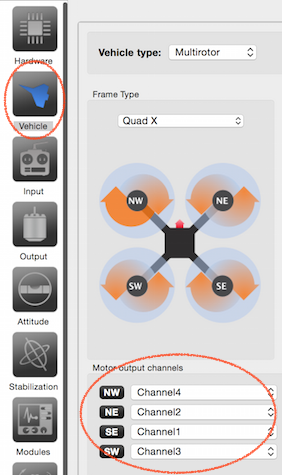
Output mapping on Vehicle screen
Some aircraft will require changes to board orientation on the 'attitude' config pane. If the front of your flight controller does not face forward, make the appropriate changes there and then re-run level calibration. Board orientation can be confirmed on the Flight Data screen; when the right side of the quadcopter faces the ground, the right side of the artificial horizon should be brown.
Selecting flight modes and preparing for AutoTune
After you have completed radio setup, the GCS will place you on the input configuration screen.
First, select "Arming Settings" at the top of the screen and select an arming setting.
If you have configured an arming switch, select "Switch+Throttle+Time." Otherwise, it is recommended you select "Yaw Left+Throttle". In this case, holding the throttle down and the yaw control to the left side for a second will arm the flight controller. Holding it to the right side for a second will disarm the flight controller. Click "Save" to apply these settings to the flight controller.
Arming mode when using HangTime
If you are planning to use the HangTime feature, which allows your craft to maintain stabilization at low / zero throttle, it is recommended to use the "Switch+Throttle+Time" arming mode. For modes that use stick inputs to arm/disarm, the HangTime feature can cause the motors to spin when disarming.
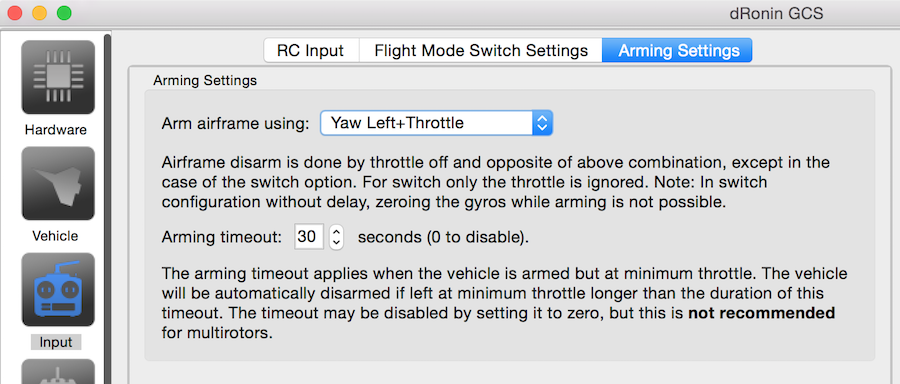
Arming Settings
Remember and test your arming setting
If something goes wrong, immediately disarm! Most times aircraft are lost or broken would be recoverable with little damage if the operator had decided to disarm promptly rather than try to "save it."
Next, select "Flight Mode Switch Settings." At the upper-right corner of the screen, select the number of positions your flight mode switch has. Configure one flight mode position for "Autotune" and the other flight mode positions to "Leveling" for your first flight. In the upper right, select the number of positions that your flight mode switch has (usually 2 or 3). Click "Save" to apply these settings to the flight controller".
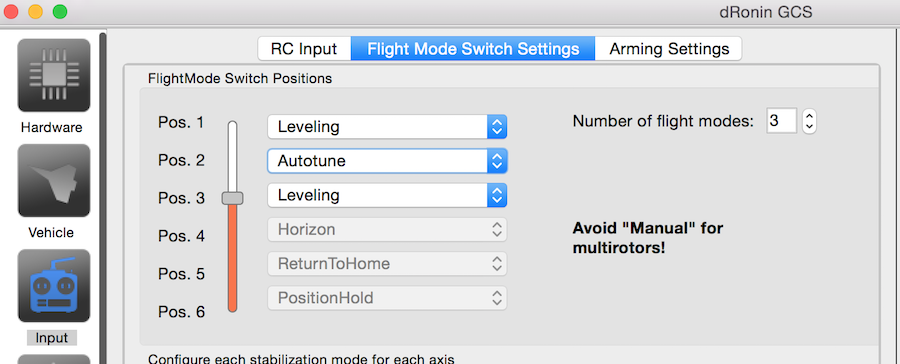
Flight Mode Configuration
Finally, on the left side of the screen, choose "Autotune". Check the box at the bottom of the screen that says "Enable Autotune Module" and click "Save" to apply this setting to the flight controller.
Verify settings and configuration
Remove all power from the flight controller, re-connect the battery, and connect to GCS. Ensure that the transmitter is powered and look at the alarms on the "Flight Data" pane (selected at the bottom of the screen).
If all is well, you should see something like this:
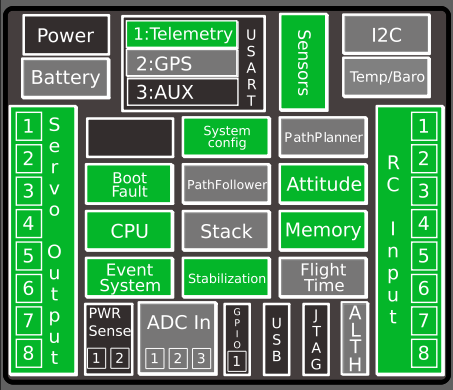
System Health Gadget
If a module isn't green...
If a module is red, there is likely a problem with the associated portion of configuration. (It is normal for memory to be low at this point on CC3D and Naze32). Clicking on a module that is red or yellow (or x'd) usually provides additional details on the configuration problem.
If you see a System config alarm, it is possible that autotune was set as a flight mode without enabling the autotune module or the flight mode switch is set to the autotune position. (It is not permitted to arm the craft with the switch in the autotune position).
When you are satisfied with the configuration and all is well, unplug the USB connection and battery from the flight controller and attach propellers.
Your first flight and running AutoTune
Take the aircraft to a field where there are few obstructions and no people around.
Arm the aircraft in leveling mode and take off (apply a small amount of throttle). Ideally, the craft will be slightly undertuned and somewhat sluggish with default settings. If the quadcopter shakes violently, land it and reduce the rate P gains on the stabilization pane. Also confirm the board orientation and motor mapping.
If the aircraft flies well (but sluggishly), flip to the autotune flight mode. The aircraft will then wobble for 60 seconds. Your flight controls are still effective to control the quadcopter. Let it do its thing, and when the wobbling stops, land it and disarm. Autotune has measured the flight behavior of your aircraft but has not applied the settings yet; this requires using GCS. You can disconnect the battery at this point, as the AutoTune results have been stored in the flight controller.
Applying AutoTune results
After your autotune flight, connect the flight board to GCS (no battery is necessary, so you can leave props on). A wizard will automatically open inviting you to evaluate your autotune results.
The wizard will show you the measured parameters– which you can ignore. Then, you can select damping and noise sensitivity coefficients. For now, leave the sliders alone and continue through the wizard, which will save the new tune to the flight controller. On flight controllers with limited resources, like Naze32 or CC3D, now is a good time to uncheck the autotune checkbox and remove the autotune flight mode.
Next, you can fly in leveling again. If all is well, your aircraft should be much more responsive due to using ideal control system parameters.
If it is necessary to fly an autotune flight again (perhaps because you've changed the vehicle's physical configuration, or because the autotune measurement didn't work), it's recommended you first reset the inner and outer loop PIDs back to default on the stabilization settings pane.
Share your AutoTune results!
On the last page of the autotune wizard, there is a "Share Tune and Vehicle Data to Cloud Service" checkbox which lets you submit your autotune results to the dRonin AutoTune database. Doing so helps the developers to further improve the system and it lets you compare different tunes of your craft. It's also handy if you want to show your results to others or get support on IRC.
You're done, and have a functional flight vehicle!
Things you might want to do next
- Configure flight mode switch the way you like it (Rate? Horizon? etc.) and disable the autotune module.
- Turn up rates on the 'Stabilization' advanced page to allow flips and other aggressive maneuvers.
- Set up an on-screen display.
Updated less than a minute ago
