Upgrading an Existing Flight Controller
It's easy to migrate from Tau Labs or past dRonin releases.
Are you running a past dRonin release? Or do you want to upgrade from Tau Labs?
Just plug it in!
The dRonin Upgrade Assistant uses a web service in the cloud to translate configurations from supported versions to a setup that will run well on current dRonin, minimizing the amount of reconfiguration that is necessary.
Prerequisites:
- Flight board running past dRonin, BrainFPV, or Tau Labs firmware
- Functional internet connection
(see Using Naze32 for details on Naze32).
dRonin Upgrade Assistant
dRonin (and other OpenPilot-family firmwares) have a bootloader on the flight board. The Ground Control Station software is able to communicate with this bootloader to upgrade to new flight code.
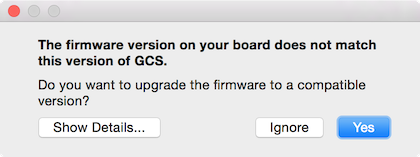
When a board is plugged in and powered by USB, it hesitates in the bootloader for a moment to see if the GCS wishes to speak to it. If GCS is running at this time, it retrieves the version information from the board to determine if it needs an upgrade. If it does, you will see a dialog like this:

Click "Yes" to proceed with the automated upgrade.
The upgrade assistant goes through these steps:
- Entering the bootloader. (automatic)
The upgrade assistant ensures it is connected to the bootloader and gathers information about the flight board.
- Checking the availability of the cloud service. (automatic)
Before changing firmware on the flight board, the upgrader ensures that it has all the proper firmware objects and that it is able to communicate with the cloud service. At this step, you may receive a warning if you are attempting to upgrade from a version of firmware that the cloud upgrader is not familiar with. In this case, you should either choose to discard your existing settings or cancel the upgrade
- Upgrading the bootloader. (automatic, only performed if necessary)
If the bootloader is out of date, it may be necessary to upgrade it to a new version.
- Flashing and entering the legacy upgrade tool. (automatic, only necessary on CC3D flight board)
The original CC3D loader is not able to download the settings from the external flash chip, so a special tool is flashed to retrieve the existing configuration.
- Downloading the settings partition. (automatic)
The raw binary configuration is retrieved from the flight board.
- Using the cloud service to translate the settings to a text format. (requires user intervention)
The GCS is unable to interpret configurations from old versions of the flight control software. To simplify migration, we have installed a service in the cloud that is able to translate old binary configurations into an XML configuration dump appropriate for the current revision of dRonin.
To proceed, save a copy of the retrieved configuration when prompted; this copy is a backup in case anything goes wrong with the rest of the upgrade process.
- Erasing settings partition. (automatic)
The flight controller's settings are erased in preparation for upgrade.
- Re-entering main bootloader from the legacy upgrade tool. (automatic, only necessary for CC3D)
- Flashing the latest dRonin firmware to the flight board. (automatic)
- Starting the dRonin firmware. (automatic)
- Importing settings. (requires user intervention)
Click the button to review the imported settings in the dialog, and then "Save" to save them to the flight controller.
About warnings in the import window...
If configuration objects have changed between the release you're upgrading from and the current release, you'll receive some warnings that IDs don't mismatch or fields are added. This is normal– it just informs you that there has been some change to the underlying configuration and you may want to review the associated UI pages before flying.
That's it-- you're done! Review the configuration and go fly.
Updated less than a minute ago
